Showing posts with label Writing. Show all posts

Tuesday, June 16, 2026

Sandy Neck oil painting

I started an oil painting of the Sandy Neck community I had done in pencil earlier. I had to deal with the same situation where the scene was far away and its apparent size too small to paint. I used the same approach of rotating the panel 90˚ and marking off salient features on the short side except instead of using the entire short end, I just used a bit more than 4" and constructed a rectangle of that height on the long side. This meant I could scale it up almost 3 times instead of 1 1/2 times with the 4" x 6" sketchbook page.

I wanted to change to overall aspect ratio of the panel, which I did using Duodecimator™, a gadget I devised some years ago. If you line it up with the short end of a 10" x 12" panel, it will show you where to crop it for a specific aspect ratio, I chose 9:16, which is used in film and video, and has some interesting proportional properties of its own.

1 Painting in its current state. I'm going o to let it marinate before making any more changes to it.

Oil painting of distant village with houses and a lighthouse on a flat shoreline across dark. choppy water. Late afternoon sunlight illuminates the buildings beneath a large sky with blustery looking clouds

2 The setup with the panel rotated to do sight sizing on the short end.

Pochade box with canvas mounted vertically, positioned so that the line of distant buildings appears to sit on the left corner of the panel.


3 closer look at the setup; still not close enough to see what I saw, which was the whole scene aligned with the section of the panel to the left of the clamp.

Closeup of left side of panel with buildings in focus behind it

4 Closeup of the tick marks on the short end.

Closeup of panel with tick marks and labels: "LH" for lighthouse, "LD" for little dune, "BD" for big dune.


5 The panel rotated back to horizontal with the 4" x 12" rectangle, slope intercepts and scaled up reference marks at top.

Panel with scale diagram: a horizontal violet line marks off of rectangle about 4" high, with diagonal violet line sloping up lower left to upper right corner.

6 Duodecimator™ in position with mark at 9:16 cut off point.

Panel with Duodecimator held against left side. Duodecimator is a piece of wood with numbers and symbols marked off on it to designate various aspect ratios.


7 Panel with construction lines erased, tape marking off 9:16 rectangle, and scaled up reference point s along top side.

Panel with blue tape marking where to crop the panel.

8 Horizon line draw in at about 1/5 height, reference point transferred to horizon, and sky background blocked in.

Panel with blue tape, violet line indicating horizon with tick marks indicating salient landmarks

9 Painting setup with umbrella. I did three sessions; on the second day, the wind was so strong I couldn't use the umbrella to shade the panel, and worked under direct bright sunlight. I mostly worked on the water that day, so it has the equivalent of a different white balance to the rest of the painting.

Pochade box with panel with sky and water blocked in, shade umbrella on left and water and distant shore behind.


Tuesday, July 16, 2024

Paul Rahilly 1933 - 2024 RIP

Oil self-portait of Paul Rahilly

Paul Rahilly, artist, teacher and good friend to many aspiring artists in the Boston area, died yesterday, July 15, 2024. He was one the few keeping the flame of figurative art alive during the late 20th century, and taught several generations of students the figure drawing and painting skills to build their own styles and approaches. I first encountered him at a life drawing class at Mass Art night school in the early 80's, and immediately realized that he was offering the knowledge and attitude to art that I had been seeking. It could be summarized as a method for identifying the intuitive, gestural sense of a pose and relating it to an armature, a "system of lines," that made it possible to record the essentials with verve and accuracy without wasting energy on aimless scribbling or getting bogged down in compulsive recording of detail. I went on to take his classes repeatedly, and with a few fellow recidivists established a painting group (the "Rahilloids") to continue to develop our skills with this knowledge. He became a good friend to all of us, and his influence is present with me to this day, as are the close friendships I found in his classes.


Oil painting by Paul Rahilly of studio with easel, unfinished painting,  female model with patterned sheet over head and palette table

Oil painting by Paul Rahilly of female model wearing green turban, black camisole and striped cloth wrapped around waist seated on couch with various objects including Pepsi can, studio spotlight with reflector, and bicycle handlebars


Saturday, January 1, 2022

Making some new Hor:Ratios

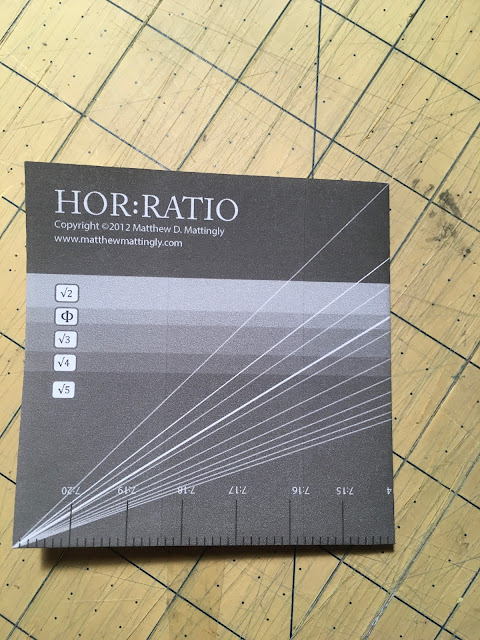
Five copies of "Hor:ratio fanned out on cutting mat. Hor:ratio is shown as a folded square with symbols for square roots of 2,  3, 4, and 5, as well the greek letter phi, denoting the "golden ratio," along with corresponding angled lines and subdivisions of the square. The text reads "Hor:Ratio Copyright © 2012 MatthewD. Mattingly www.matthewmattingly.com

Five printouts of Hor:ratio


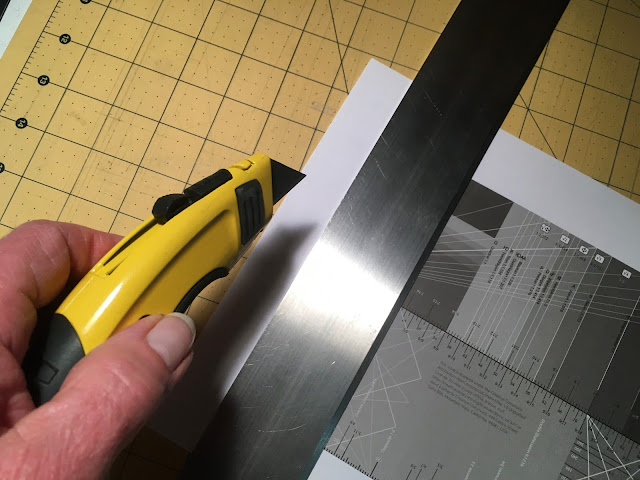
Close up of hand trimming Hor:ratio with mat knife and straightedge.


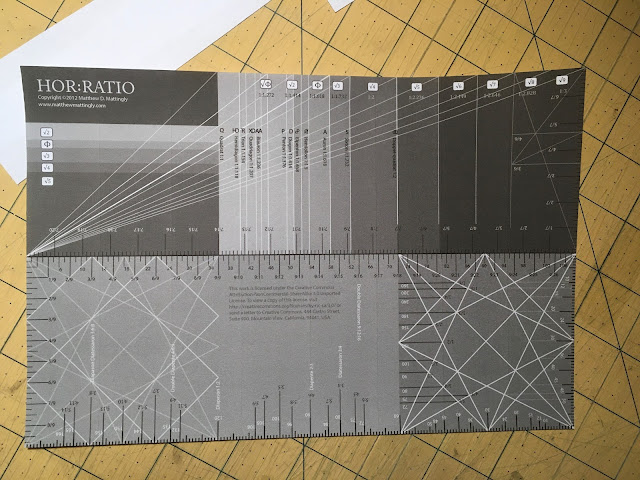
Trimmed version of Hor:ratio, unfolded, showing two sides, one based on root rectangles and other "non-commensurate" proportions, and one based on the "armature of the rectangle and devoted to "commensurate" proportions.


Close up of hand scoring hor:ratio with bone folder


Hor:ratio, folded lengthwise


Horatio, folded in thirds, front


Horatio, folded in thirds, back

 Hor:ratio is a device I came up with to work with rectangular aspect ratios and proportional subdivisions. It has become an indispensable part of my kit, useful for analyzing compositions, copying works of art, creating thumbnails, etc. When they get worn out I just print out a new batch, trim, score, and fold to make a handy pocket reference and proportional protractor.

If you are interested in the geometrical aspects of artistic composition or curious about the arcane world of root rectangles, diatessarons, and hemiolions, you can get your own Hor:ratio and instruction booklet right here at www.matthewmattingly.com under the Hor:ratio tab. Free, no registration or personal information required. I would appreciate any feedback.

Sunday, January 4, 2015

Horizon Lines and Measuring with Diagonals

The question of placing the horizon involves several factors. In this context, "the Horizon" doesn't necessarily mean the line between Earth (or Sea) and Sky (in many scenes this is not even visible); but an abstract reference line representing your eye level.
Whenever you are observing any scene, this implied horizon is present; it's an attribute of you as the observer.
If your eye level is high, the horizon is high, if your eye level is low, the horizon is low. As a general rule, this equates to larger or smaller proportions of ground plane to sky, respectively.
For purposes of simplicity, we'll confine ourselves for now to describing situations where we are looking straight ahead, parallel to the ground plane, with our heads on straight, not tilted or lying on one side.
In these situations, the horizon can be considered to be a straight horizontal line.
The horizon line will be in the center of our field of view.
Objects below our eye level will show their top planes; we are looking down on them. This is true no matter how far away they are.
Objects above our eye level will show their bottom planes, again regardless of how far away they are.
Planes exactly at eye level are not visible - only their edges are presented to the eye, in line with the horizon, regardless of distance.

The aspect of distance needs to be emphasized because objects will also appear smaller with distance, which can lead to confusion about whether we are actually above of below them. For instance, a distant building will seem so small relative to a near one that you might be tempted to believe you can look down on it - but if its roof is above the horizon line, it's still above your eye level.

These points all relate to the horizon's presence in any observation of a scene; the horizon line also has a part to play in constructing a picture.
A picture doesn't usually try to encompass one's entire field of view; it's a rectangle (let's stick with rectangular formats for the sake of simplicity) cropped out of the larger scene with its proportions and placement chosen for reasons of utility or artistic expression. The horizon line may appear at any position in this rectangle, dividing it up into whatever proportions the artist chooses. For that matter, it may not appear in the rectangle at all, but still play a role as an implied reference.
Since we are limiting the discussion as stated above, it will be a straight horizontal line at right angles to the rectangle's sides.

As an artist, how do you choose where to locate the horizon line when setting up a picture?
A major consideration is usually what you want to include. If you are viewing a seascape from a moderate height you have the option of emphasizing either one or the other or both equally. If you wanted to devote most of your painting to the sky, you would select a rectangle such that the horizon line was placed near the bottom. This will not change your relationship to the horizon as observer, and a rock that is below your eye level will still show its top plane; it simply means that you have chosen to crop out a lot of the lower part of your field of view.
Another consideration is the design of the picture itself. The horizontal division can be a very powerful factor in the overall design, and we are often warned against putting it in the middle, because that would be boring, or cut the picture in half. That's a good rule of thumb, but you are the final arbiter - you can put it wherever you think the design needs it.

This has been a lot of verbiage just get a horizontal line across a sheet of paper. Once you have it, what is it good for?
The horizon, along with the rectangular bounds of the picture, provides the basic reference against which we measure all the other elements. Every element will be some distance above or below it and oriented at some angle relative to it.
This is an area where confusion can creep in, because we use the horizon as reference for both the 2d layout of the picture and the construction of the illusion of depth with linear perspective. It's important to keep track of which you are doing when. When sketching from a scene, we typically start with the 2d layout, measuring ("sighting" in Betty Edwards' terms) the size, placement and angles of the scene's elements.
Edwards, in Drawing On the Right Side of the Brain offers this process: First, identify some easily measured element in the scene, such as a door frame top, then measure with your thumb on the pencil, call that distance your "Basic Unit," then calculate the lengths of other elements using that unit; the door frame side might be 2 and 2/3 Basic Units, in her example. You then have to translate that ratio to whatever scale your drawing is.

Frankly, this seems incredibly tedious and error prone to me. No way my big fat finger is going to accurately mark off 2/3 of a distant door top on the side of pencil. All that converting into numbers and back into shapes - way too left brained (which she admits).
However, the very next paragraph, she is on to measuring angles, using the pencil to gauge them relative to the horizontal and vertical lines, and visualizing the triangles they make as aids to memory when transferring them to paper.
Which leads me to ask

WHY NOT JUST USE ANGLES FOR EVERYTHING?

When measuring, we are concerned not with absolute quantities, but with ratios. Ratios can be expressed with slopes (angles)! Any shape or collection of shapes can be imagined as bounded by a rectangle, and the proportions of the rectangle are given by its diagonal.
Given a rectangle of a given format and a horizon line of a chosen position, start by simply measuring the diagonals of the whole picture and of the upper and lower sections. Use the diagonals to find the center points and horizontal and vertical center lines. Mark or memorize these. Then find the largest element and visualize a bounding rectangle enclosing its widest and highest points, estimate its location relative to the larger rectangles, measure its diagonal to establish its proportions, and move on the next largest element.
After a while, the layout will be well enough established that you can proceed more intuitively, without having to do so much measuring but confident that you are not going significantly awry.

Here's a little sketch I did to test out this idea. It's out of a bay window, with some squashes and aloe plants on the shelf in the foreground, then the window through which is seen a patch of back yard, a maple, a line of trees and underbrush, a small ravine with a field sloping up behind it, some more trees and buildings, and a small mountain range in the distance. The range of distances and sizes of objects make this a challenging subject, although the window provides a nice rectangular reference for free.


This photo more or less encompasses my actual field of view. The area I chose for the picture is miniscule in context.


In order to figure out where my eye level was relative to the scene, I used a few different strategies. First was to make sure I was looking straight ahead and then estimating the center of my field of view. I visually extended the orthogonals of the porch on the left to see where they crossed, and noticed that they converged on a house across the field. It seemed reasonable to assume that the first floor window of that house might be roughly on a level with mine, so I placed my observed horizon there, just above the far end of the field.


I decided I wanted to include more space for the squashes on the shelf than for the bay window ceiling, so I set the picture's horizon high, about 3/5 of the way up.
I next took a diagonal from corner to corner of the window and extended it down to bottom the page. This helped to place the near edge of the shelf, creating the space in which the squashes and plants would sit. I needed to establish the highest point that the aloe leaf reached, so I imagined a horizontal line at its tip, made a diagonal from its intersection with the window edge to the window bottom, and used that to find the point in the picture. I did a similar exercise to locate the far end of the back yard.
The two standing squashes seemed to function as a single design element, so I imagined a bounding box for them, pulled the diagonal, and transferred the proportions to the picture. I could see that the left squash overlapped the window frame, and, because I knew where the center line of the window was, that the right one lined up with it. Given this width and the measured diagonal, I could find the correct height for the pair, and then go in and draw them individually.
That done, I could draw the other stuff freely, knowing the basic layout was correct. Well, actually I still screwed up in a couple places, losing track of which line was which, but with this methodical approach, it would be pretty easy to fix.

Friday, December 26, 2014

The Montanapolitan Croptic

I call my new sketchbook The Montanapolitan Croptic.

Montana, because it is held together with dental floss, portmanteau-ed with Neapolitan, in honor of its three flavors of paper (plain, toned, and watercolor) and Croptic because its Coptic stitching is cryptically concealed on the double page spreads.


 The toned paper signature, showing the threadless page gutter.


 A handy pocket for your Hor:ratio or other accessory.


Basic Construction

I used Canson Biggie Drawing pad paper for the plain pages. It takes the Noodler's Konrad/ Noodler's black combo quite nicely. The toned drawing is from the Strathmore Toned Tan pad, and the watercolor paper is Arches 140 cold pressed. The dimensions are 6" x 4", which I like as a format and which I could get from the 12" x 16" sheet of relatively expensive Arches with no waste. I had to lose bits of the Canson and Strathmore papers to match the format, but the cost was less.
I bound the three signatures with the modified "cryptic" Coptic stitch and covered it with fabric from an old pair of black Wrangler jeans. It turns out that the denim isn't the best for this application - it unravels easily and is hard to cut straight, but once it's all glued in it seems to work OK. 
There are many references for the basics of coptic stitching and sketchbook construction - here are some excellent ones:


How to do the Cryptic stitching

Do the regular Coptic stitch binding, but instead of a full page in the middle of each signature put a narrow strip of paper and sew that in, as if it was another page, then glue the middle page to the strip. Now there are no threads or holes in the middle page, so you can draw right across the double spread. There is still a bit of crease or gutter, but that's livable with.

Here are the components for a simple version with only two signatures. The signatures are already punched, along with their center strips (which also make handy templates for the punch). Below them are the the pristine, unpunched middle pages, and the covers.


The signatures, covers and tapes have now been sewn with the Coptic stitch and waxed dental floss. You could also use special bookbinding thread, or plain thread with wax on it. Since this photo was taken, I learned that a curved needle makes stitching easier.


The strip is glued. I used archival PVA glue, but regular Elmer's or library paste would probably work fine. The extra paper tucked behind is to stop any glue from getting on the pages.


Here it is - the silky smooth inner page, with the messy threads out of sight beneath it.


From behind, the strip is visible and takes up part of other side of each page. This to me is a plus - it reminds you that if you draw there it could wind up being on the verso side of your centerfold drawing. This actually happened to me - someone wanted to buy and frame a centerfold painting I did, but there was another painting on the verso that I didn't want to hide behind the mat, so I built a special frame with glass on both sides.


Saturday, November 22, 2014

Perspective hacks III: Bleep the Veeps!

In the first Perspective Hacks we looked at the diagonal vanishing point, and how to replace it with a proportional estimate and an internally generated grid.
In the second, we explored the "folded vanishing point" technique in which the remote VP is relocated to the page and used to generate related orthogonals.
In this installment, we will learn how to set up a "two point" perspective drawing with no points at all.
Imagine that you are stuck overnight in a desolate airport, with nothing to amuse yourself but a sketchbook, a pencil, and some scratch paper. You decide to create an elaborate perspective drawing from imagination. Or perhaps you are sketching a bucolic scene, but in the middle distance is Salisbury Cathedral or similar complex structure. You wish you could use perspective to help construct it, but you have no drawing board or thumbtacks.
As with the other exercises, we start with a single orthogonal. This can be based on measurements, observation, or pictorial considerations, but will provide the basis for all related lines following.
Here we see the horizon line, central vertical line, and initial orthogonal. We are assuming this slanted line stands for a line parallel to the ground plane and rotated on its vertical axis so it appears to recede towards the horizon.


We could use the edge of the paper as a reference, but here we are using a guideline, which can make it easier to make accurate measurements or simplify proportions.


Here's were the scratch paper comes in. It can be practically any rectangular piece - a post-it note, a sheet of notebook paper, etc. Business cards or the subscription cards that come with magazines work nicely, as they are printed on heavier card stock. We are going to use this as a "ruler" to find the proportional relationship between the orthogonal and the horizon line.
First label one side of your ruler "L" for Long. It's important to keep track of which side is which. Line the ruler up with the horizon and center lines and mark it with a horizontal line at the intersection with the orthogonal. The horizontal should extend a little way across the ruler.


Now, rotate the ruler 90˚ so that the edge that was the top lines up with the guideline and the horizon line. Label this edge "S" for "Short."
Mark the intersection with the orthogonal with a horizontal line intersecting the L mark.


Draw a diagonal from the opposite corner through the intersection of the two marks. The slope of this line embodies the proportional relationship of every orthogonal parallel with the first to the horizon.


To create a new orthogonal parallel to the first and appearing to recede to the same vanishing point, start with a line on the center vertical where you want it to start.


Line up the Long side of the Ruler as before, and draw a horizontal line at the location of the mark you just made so as to intersect with the diagonal.


Rotate 90˚ and line up with the horizon and guideline. Draw a horizontal line from the intersection of the diagonal with the line you just made out to the edge of the Ruler.


Mark the guideline at this point.


Draw a line through the the two marks to the edge of the page. This is your second orthogonal.


Here's the third, constructed the same way.


For the fourth, we start under the horizon line.


Turn the ruler upside-down and make a horizontal line intersecting the diagonal. Here, we used the opposite side to make the mark. There are several ways you could accomplish the same thing, depending on the size and shape of your Ruler.


Rotate ruler so that what was the top is lined up with the Guideline. Draw a horizontal line through the intersection with the diagonal and mark the guideline as before.


Draw a line through the two points. This is another orthogonal parallel to the others, but originating below the horizon line and pointing up the same implied vanishing point.


Perspective Hacks I

Perspective Hacks II
Perspective Hacks III
Perspective Hacks IV
Perspective Hacks V
Perspective Hacks VI


Perspective hacks IV: The Box

As I mentioned in the first Perspective Hacks, I was very taken with Bruce McEvoy's model of a simplified perspective situation:

Having come into possession of a clear plastic cube, I decided to create a physical model of it.


The first step was to place the picture plane so as to divide the cube in half, so that the distance from the ground plane to the centerpoint, one half the cube's height, would equal the distance from the viewpoint to the picture plane.


I cut the picture plane out of an old CD jewel box, inscribed the horizon line, vertical center line, and circle of view on it, and mounted it at the halfway point.


On the facing side of the same piece, I made a line from the middle of the bottom edge to the centerpoint, representing the viewer's eye height and viewpoint.


I made a rectangular opening in a square sheet of paper to mask off part of the picture plane, leaving a window to reveal the space on the far side. Note that the center of the picture window is not the same as the center of vision.
The window could be any arbitrary size, shape, or position in the plane, although usually the center of vision (the main vanishing point) is somewhere near the center of the picture.


The space behind the window is defined by two inclined planes at 45˚, meeting at the horizon and inscribed with a grid of orthogonals and diagonals.


Figuring out how to plot this grid was a puzzle, and led to some interesting insights into the wider subject of space division in a rectangle, so I'll address that in a separate installment. Basically, the inclined planes mimic the appearance of infinite ground and sky planes receding to the horizon, but contained in the half-cube opposite the viewpoint.

I tried to get a photo from as close as possible to the actual viewpoint. It should give the impression of looking into 3D space (on a really gloomy, depressing day in some sort of post-apocalyptic dystopia).