 The name, Stare-I/0, is meant to suggest the use of two identical components (speakers/rulers) interacting with the human perceptual system to convey spatial information.
I/O (Input/Output) because Stare-I/O takes an input in the form of a sight size measurement, runs a transformation on it and outputs it as a scaled measurement. And you end up doing a lot of staring when you use it.
Stare-I/O provides a way to hold the measuring tool at a constant distance from the artist's eye, which is crucial to taking consistent measurements. If the scale of the drawing matches the apparent size of the scene from the artist's point of view, then measurements can be transferred directly to the canvas. (I'll be referring to the working surface as the "canvas" even though it can be paper or other material). I added a comment below about a method of direct sight size drawing.
If, however, the apparent size needs to be scaled up or down, we need a constant factor to multiply or divide by. Stare-I/O is intended to be used primarily in situations where the canvas is supported by an easel or pochade box at a relatively constant distance from the artist.
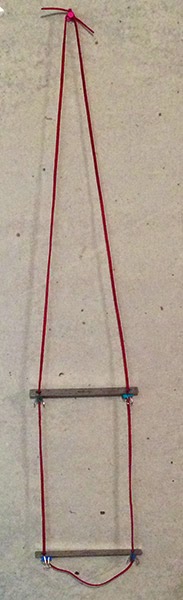
 Stare-I/O employs two rulers strung onto a lanyard and positioned with adjustable barrel locks.
The rulers are used to hold a measuring tool at a constant distance from the artist's eye, but now there are two constant distances to work with. The basic principle is that measurements taken on the farther (or "distal") ruler will appear larger when applied to the nearer (or "proximal") ruler. If we take a measurement on the distal ruler - let's say we use the ruler's own markings and find that the apparent width of a distant building equals one inch on the ruler - and then compare it with that "same" inch on the proximal ruler, the proximal inch will appear larger. How much larger is in proportion to the change in distance from our eye. If the proximal ruler is half as far as the distal, the measurement will appear to be twice as large, or two inches.
The next step is to transfer the scaled measurement to the canvas. Since the canvas is held at a fixed distance from our eye, we can view it together with the proximal ruler, and mark the canvas with the new measurement, by reaching out to the canvas and "tracing" the measurement.
Note that our mark on the canvas will not be the same size as the proximal measurement - it will be larger in proportion to the distance of the canvas from our eye. However, it will be consistent from measurement to measurement, and it will appear to any viewer at the same distance from the artwork to be the same size as our proximal measurement.
How do we know what scale to use? This is determined by how we wish to frame the composition and the size of the canvas. So first, we need to establish an imaginary frame for our composition, visualize it surrounding the scene, and then measure the sight size of its sides.
Position the distal ruler so its length or a portion of it matches the horizontal side of the frame, then position the proximal ruler so it matches the width of the canvas. Now, any measurement taken along the distal ruler and transferred to the proximal ruler can be mapped onto the canvas in correct proportion. A bubble level can be used to ensure that the ruler is horizontal.
Here, the distal ruler's middle two inches map onto the width of my imaginary frame.

On the proximal ruler, the same two inches map onto the apparent width of my canvas.

Note that this all assumes we are scaling up, and using a landscape (horizontal) format. To scale down, we would start with the proximal ruler and transfer to the distal, and for a vertical format we might rotate the rulers 90˚to measure the longer side.
Using a picture plane
Measurements may be taken using the ruler's increments, a caliper or dividers, or marks on paper - any thing that can be held against one ruler and moved to the other.

These are all one dimensional measurements along a side - in order to plot a point on the two dimensional picture plane, we need to take two measurements, one on each axis. However, it is possible to plot points, or even draw outlines, directly on the picture plane by holding up a transparent window to the ruler and drawing on that. When the the window is moved to the other ruler, the location of the points and lines will scale just like the 1D measurements.
One nice thing about this is that you can cover your layout sketch with paint but get it back by looking through the picture plane again.
I made a picture plane from an old CD jewel box cover. It's just about the right size to fit the six inch ruler, and works for drawing with various inks. I've been using a Sakura Pigma Micron, which writes on the plastic and stays as long as you need it, but wipes off easily when you're done. I lopped off about an inch of plastic from the sides at one end so it would fit snuggly over the ruler.


PlumbBobby
It's important that the plane be not only level, but plumb (vertical), or the measurements will be distorted and inconsistent. This is somewhat difficult to measure when you want to simultaneously look through the window because you would have to look at it from the side to judge the angle. My solution is an "inclinometer" consisting of two bobby pins hanging from binder clips attached to the little "ears" that used hinge the cover onto the CD case*. One hangs in front, and the other behind, so if the plane is leaning towards you, the pin on the far side clatters against the plastic, and if it leaning away, the near side pin clatters. I tested this out on a very windy day, and it worked surprisingly well. The other bobby pin swings right and left to work as a level.

Calibration
Stare-I/O works perfectly well without having to think about numbers or math - it's all visual and intuitive - but if you did want to calibrate it and enable scaling to a numeric ratio, this is possible.
Here is a close up with the incremental calibration marks. I established the marks using the inverse of the the principle used to take measurements: I set up a yardstick taped horizontally to a box as a reference, and positioned the distal ruler so that the "middle half" - the 18 inches centered, with 9 inches on either side - mapped into the central 2 inches on the ruler. I then positioned the proximal ruler so that the middle two inches mapped onto the entire yardstick. Because objects' apparent size reduces in proportion to distance, I knew that the proximal ruler must be half as far from my eye as the distal. I then marked both points on the lanyard in white, and filled in the intermediate increments by subdividing into halves, quarters, etc. I can now scale up by ratios like 1/1.25 by setting the proximal ruler to the 1/4 mark. The marks also make it easier to set the two barrel locks to the same distance so that the rulers are parallel.

*This presupposes that you can find a cover with ears intact, an admittedly risky assumption. Here's the painting I did on that windy day

2 Find horizon or eye level. Use pointing technique* or eyeLeveler
3 Frame sceen or motif, using fingers or viewfinder.
4 Locate horizon relative to frame. If using a viewfinder, you can mark it with a paperclip or similar.
5 Draw horizon line in corresponding position on artwork.
6 Identify a few landmark points, e.g. treetops.
7 Use Reticulanyard or StareI/O to hold artwork at fixed distance from your eye.
8. Measure horizontal and vertical locations of salient points relative to edges or horizon line. Mark on paper.
9 Connect edge marks to locate landmark points on artwork.
10 Complete layout sketch by whatever combination of measuring and eyeballing works best for you
. * By this I mean a trick I leaned from James Gurney's Artists Guide to Sketching: Point to the distance as if you were pointing to a ship on the horizon (even if you're indoors). Your finger will be at your eye level. In the sketch below, you can see the eye level line, tic marks at the edges of the paper corresponding to landmarks, and the lines connecting the horizontal and vertical references to locate the points on the picture.

The same sketch with more detail from memory and photo ref.

These are all one dimensional measurements along a side - in order to plot a point on the two dimensional picture plane, we need to take two measurements, one on each axis. However, it is possible to plot points, or even draw outlines, directly on the picture plane by holding up a transparent window to the ruler and drawing on that. When the the window is moved to the other ruler, the location of the points and lines will scale just like the 1D measurements.
One nice thing about this is that you can cover your layout sketch with paint but get it back by looking through the picture plane again.
I made a picture plane from an old CD jewel box cover. It's just about the right size to fit the six inch ruler, and works for drawing with various inks. I've been using a Sakura Pigma Micron, which writes on the plastic and stays as long as you need it, but wipes off easily when you're done. I lopped off about an inch of plastic from the sides at one end so it would fit snuggly over the ruler.
PlumbBobby
It's important that the plane be not only level, but plumb (vertical), or the measurements will be distorted and inconsistent. This is somewhat difficult to measure when you want to simultaneously look through the window because you would have to look at it from the side to judge the angle. My solution is an "inclinometer" consisting of two bobby pins hanging from binder clips attached to the little "ears" that used hinge the cover onto the CD case*. One hangs in front, and the other behind, so if the plane is leaning towards you, the pin on the far side clatters against the plastic, and if it leaning away, the near side pin clatters. I tested this out on a very windy day, and it worked surprisingly well. The other bobby pin swings right and left to work as a level.
Calibration
Stare-I/O works perfectly well without having to think about numbers or math - it's all visual and intuitive - but if you did want to calibrate it and enable scaling to a numeric ratio, this is possible.
Here is a close up with the incremental calibration marks. I established the marks using the inverse of the the principle used to take measurements: I set up a yardstick taped horizontally to a box as a reference, and positioned the distal ruler so that the "middle half" - the 18 inches centered, with 9 inches on either side - mapped into the central 2 inches on the ruler. I then positioned the proximal ruler so that the middle two inches mapped onto the entire yardstick. Because objects' apparent size reduces in proportion to distance, I knew that the proximal ruler must be half as far from my eye as the distal. I then marked both points on the lanyard in white, and filled in the intermediate increments by subdividing into halves, quarters, etc. I can now scale up by ratios like 1/1.25 by setting the proximal ruler to the 1/4 mark. The marks also make it easier to set the two barrel locks to the same distance so that the rulers are parallel.

*This presupposes that you can find a cover with ears intact, an admittedly risky assumption. Here's the painting I did on that windy day
Sight Size Direct Method Drawing at sight size on small format.
1 Choose scene or motif2 Find horizon or eye level. Use pointing technique* or eyeLeveler
3 Frame sceen or motif, using fingers or viewfinder.
4 Locate horizon relative to frame. If using a viewfinder, you can mark it with a paperclip or similar.
5 Draw horizon line in corresponding position on artwork.
6 Identify a few landmark points, e.g. treetops.
7 Use Reticulanyard or StareI/O to hold artwork at fixed distance from your eye.
8. Measure horizontal and vertical locations of salient points relative to edges or horizon line. Mark on paper.
9 Connect edge marks to locate landmark points on artwork.
10 Complete layout sketch by whatever combination of measuring and eyeballing works best for you
. * By this I mean a trick I leaned from James Gurney's Artists Guide to Sketching: Point to the distance as if you were pointing to a ship on the horizon (even if you're indoors). Your finger will be at your eye level. In the sketch below, you can see the eye level line, tic marks at the edges of the paper corresponding to landmarks, and the lines connecting the horizontal and vertical references to locate the points on the picture.
The same sketch with more detail from memory and photo ref.

