Single point or central perspective works for lines and planes that are parallel or perpendicular to the viewer; parallel lines are shown as straight and parallel to each other, and perpendicular lines converge on the central vanishing point. When a rectilinear object is at any other angle, the corner and at least two sides become visible, requiring two vanishing points.
In many cases, one or both of these points will be located very far outside the picture, creating logistical problems setting them up and using them as references. Here is one possible solution, which can "fold" a vanishing point back so it fits inside your picture, or at least onto a reasonable sized drawing board.
Set up your horizon line
Establish a vertical corner line

Choose a point "p1" on the vertical corner line.

Draw an initial diagonal "ortho 1", carried out to the edge of the paper. This can be based on sight, memory, measurement or imagination. It points to the location of our actual VP, somewhere off the paper.

Draw a horizontal line, "h-ref 1," from the point where the diagonal intersects the edge, so as to intersect the corner line and go a bit beyond it.

Measure the distance from this intersection to the ortho 1 intersection, "h1"

Mark a point "P ref" on the corner line at an equal distance "h2" below the intersection of h-ref 1.

Draw a line "folded ortho" from the intersection of ortho 1 with the edge of the paper through this mark and down to the horizon line. This line creates an angle equal to the original diagonal, but reversed.

The point where it intersects the horizon is the “folded vanishing point". It is the equivalent of setting a vanishing point outside of the picture, then folding it over to meet a point inside the picture.

Draw "ref line 1" from the folded VP up to the intersection of ortho 1 and the corner line. Note where it intersects h-ref 1.

Draw a vertical reference line intersecting this point.

This completes the basic set up. You can now use the folded vanishing point and vertical ref line to draw new orthogonals in the same vertical plane as the first.
To create a new orthogonal based on the folded VP, first mark a new point "P2" on the corner line.

Draw a line "ref line 2" from the folded VP to P2.

Where this line intersects the vertical ref line, draw a horizontal line, "h-ref 2" to the edge.
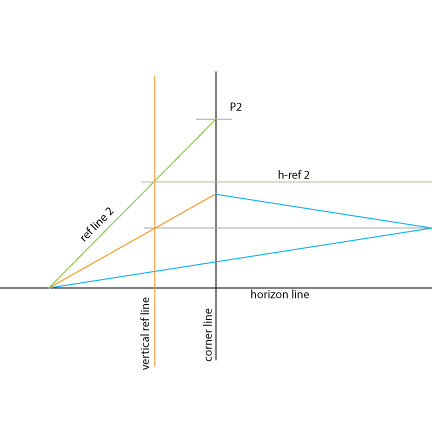
Draw a line from P2 to the intersection of h-ref 2 with the edge of the paper. This line, if carried out off the paper far enough, would intersect the actual VP at the horizon.

Repeat this process to create more orthogonals as needed.

These techniques are not without their own drawbacks. They require more steps than using "real" vanishing points, and they tend to magnify small inaccuracies. But in a situation where using external VPs is impossible or impractical, they will get the job done. The folded VP technique is still limited by the size of the paper and drawing surface and the angle of rotation - it is possible to have a angle such that even the folded VP goes out of range. Of course, you could "fold" it multiple times, but that would get even more cumbersome and prone to error. However, as with the diagonal VPs, there is a way to calculate the correct rotated angles without using vanishing points at all:
Bleep the Veeps!
How to do "two point perspective" without any points!
Perspective Hacks I
Perspective Hacks II
Perspective Hacks III
Perspective Hacks IV
Perspective Hacks V
Perspective Hacks VI
No comments:
Post a Comment